Product Creation
- Products
- Categories
- Stocks
- Reservations
Introduction
This guide will walk you through the steps to create a new product in the iPOS system. Before creating a product, ensure that you have set up the following entities:
-
Category
-
Brand (Optional)
-
Unit
-
Other Required Fields: Depending on your specific system
These elements are required to ensure that your product is correctly categorized and that your inventory management works smoothly.
Pre-requisite Setup
Create_Product


-
Create a Category
Before adding a product, you need to create a category. Categories help organize products into groups (e.g., Electronics, Groceries, Fashion).
Step 1: Go to the "Categories" section.

Step 2: Click on "New Category".

Step 3: Fill in the category name

 e.g., Electronics :- Smartphones , Laptops

        Apparel :- Shirts ,  Pants

        Groceries :- Fruits , Vegetables

        Furniture :- Tables , Chairs

Step 4: Press Create.

Optional: If you have subcategories you can add them using subcategories tab

-
Create a Brand (Optional)
Each product should be associated with a brand for better identification and tracking.
Step 1: Go to the "Brands" section.

Step 2: Click on "Add Brand".

Step 3: Fill in the brand name (e.g., "Subash Backery", "Everest Cake").

Step 4: Press Save.

-
Create a Unit
Units are required to define the measurement for the product (e.g., pieces, kg, liter). Make sure to create the correct unit for your product type.
Step 1: Go to the "Units" section.

Step 2: Click on "Add Unit".

Step 3: Fill in the unit name (e.g., "Piece", "Kg").

Step 4: Press Save.
Unit_Section

Create_Unit

Create_Product_Error


Product Name*:
Indicates that the product name field is mandatory. You must provide a product name.
Barcode*:
Indicates that the barcode field is mandatory. You must provide a barcode.
Category*:
Prompts you to select an option.
Indicates that the category field is mandatory. You must select a category.
Brand:
Indicates that a brand must be associated with the product. An error will occur if a brand is not selected.
Price*:
Indicates that the price field is mandatory. A price must be specified for the product.
Selling price*:
Indicates that the selling price field is mandatory. A selling price must be specified for the product.
Unit*:
The unit "Kg" is given, but indicates that this unit is required.
Weight*:
The weight field is not marked as required, but indicates that a weight measurement should be specified for weight-related products.
In summary, these errors and requirements indicate:
The product name, barcode, category , price and selling price are mandatory.
Weight measurements should be specified for weight-related products.
The branches where the product will be available for sale must be selected.
Errors will occur if these fields are left blank.
This document ensures that users provide the necessary information in the product creation form, allowing the product to be created and saved correctly in the system.
Published / Available
This refers to the status of the product in the system, indicating whether it is active and visible for customers to purchase.
Published → The product is listed and available for sale in the online store or POS system.
Unpublished → The product is hidden and cannot be purchased by customers.
Example:
If a product is published, it will be displayed in the inventory and can be sold.
If a product is unpublished, it is temporarily unavailable (e.g., out of stock or discontinued).
Measurable (Misurable)
This refers to whether a product can be sold based on weight, volume, or unit measurement instead of a fixed quantity.
If a product is measurable, it can be sold using a weighing scale or by volume.
If a product is not measurable, it is sold as a whole unit (e.g., a mobile phone, a book).
Examples:
Measurable Products
-
Rice (sold in Kg)
-
Sugar (sold in grams)
-
Milk (sold in Litres)
-
Vegetables (sold in Kg)
Non-Measurable Products
-
Mobile Phones
-
Laptops
-
Clothing Items
-
Bottled Beverages (fixed volume)
-
Add Product
Now that the prerequisites are defined, proceed with the actual product creation.
Navigate to Product Management:
Go to the Product Management section in the POS admin dashboard.
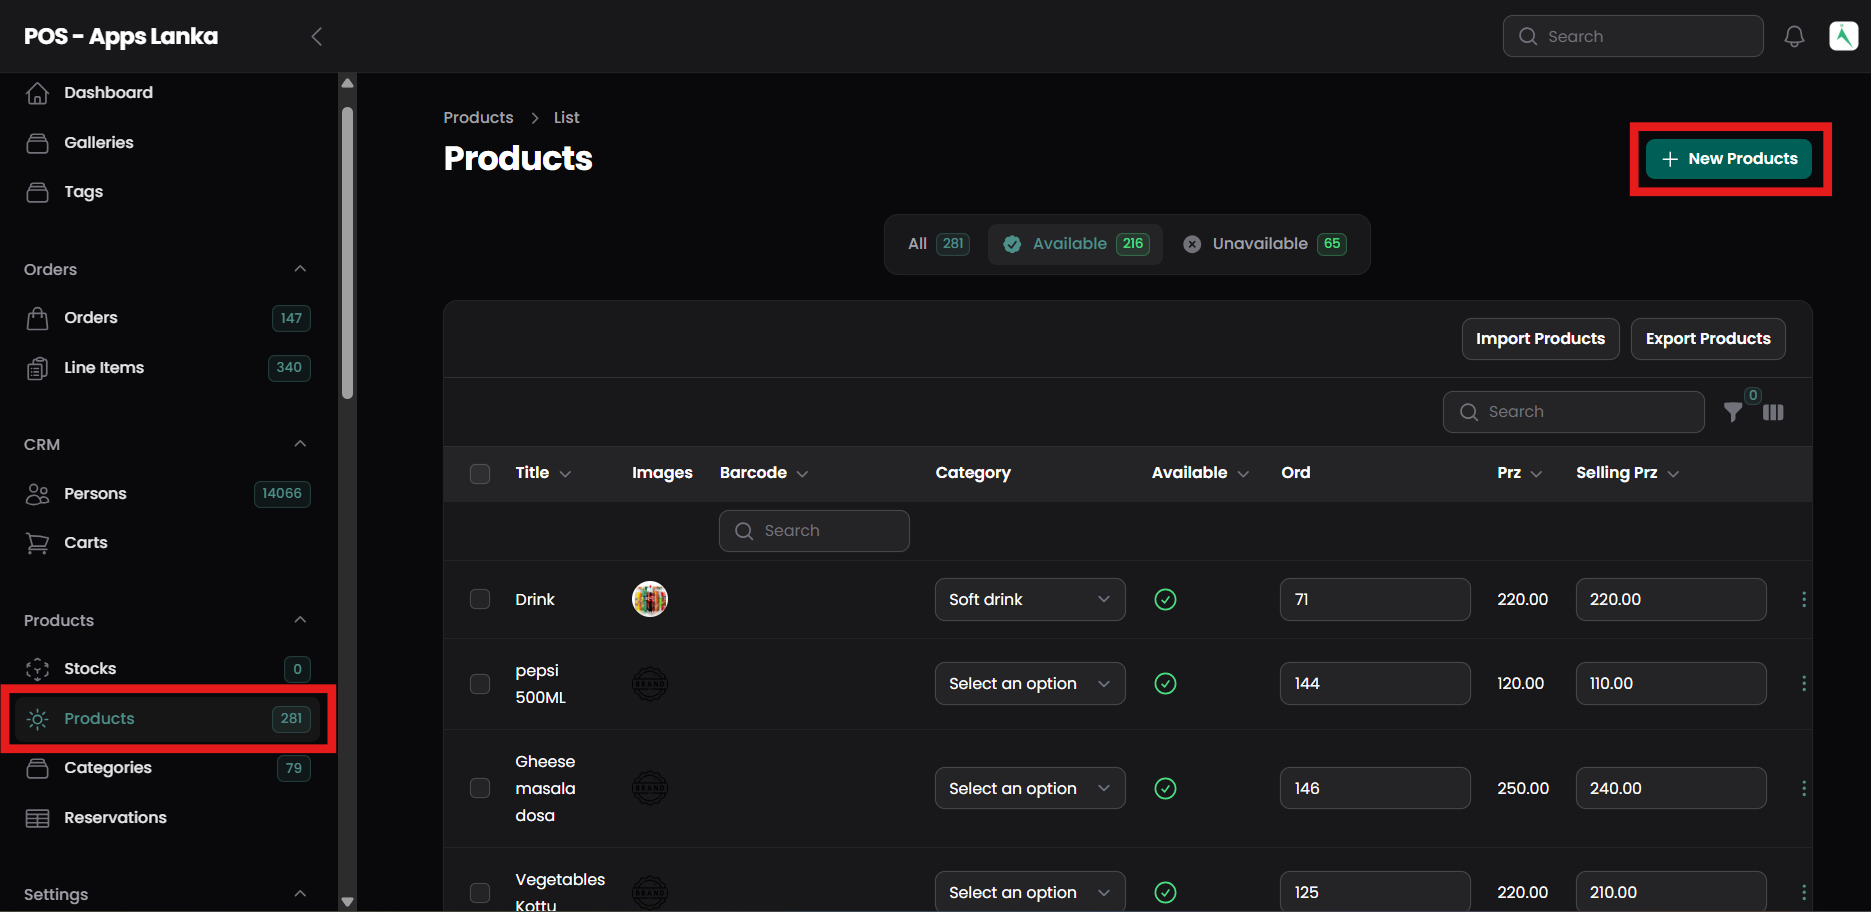
Click on ‘Add New Product’:
This will open the product creation form.
Fill in Product Information:
1) Product Name: Name of the product.
2) Barcode: A unique code assigned to each product to enable scanning at the checkout. (e.g.,1234567890123).
3) Slug : A URL-friendly version of the product name used for online stores. (e.g., Apple iPhone 14 Pro).
4) Category: Select the category (e.g., Electronics).
5) Brand: Select the brand (e.g., Samsung).
6) Unit: Choose the unit (e.g., Piece).
7) SKU (Stock Keeping Unit): A unique identifier for the product.
8) Price: Define the selling price of the product.
9) Cost Price: Define the cost price for the product (used for calculating profit margins).
10) Description: Provide a detailed description of the product.
9) Product Image: Upload a high-quality image of the product.
10) Barcode: Optionally, add a barcode if applicable.
Create Product:
After filling in all the necessary details, click on Save Product to add it to the system.
Step 5: Verification
After the product is saved, verify the following:
The product is displayed correctly in the Product List.
The correct category, brand, and unit are assigned.
The stock and pricing details are accurate.
Example Product Details:
| Field | Value |
|---|---|
| Product Name | Samsung Galaxy S21 |
| Category | Electronics > Mobile Phones |
| Brand | Samsung |
| Unit | Piece |
| SKU | SG-S21-12345 |
| Price | 999.99 USD |
| Cost Price | 850.00 USD |
| Description | The Samsung Galaxy S21 is the latest smartphone with advanced features and a sleek design. |
| Image | [Upload Image] |
| Barcode | 1234567890123 |
Additional Details :
Step 6: Next Button Click on
-
Online Store (Ecommerce) Availability
This option determines whether the product is available for purchase in the online store (eCommerce platform).
Available → The product will be listed on the online store, and customers can order it online.
Not Available → The product is not displayed in the online store but may still be available in physical stores.
Example:
A clothing brand may sell its products both online and in physical stores.
Some wholesale items might be available only in physical stores and not online.
-
Available in POS (Point of Sale System)
This setting defines whether the product can be sold using the POS system in a physical store.
Available in POS → The product can be sold at a retail outlet using the POS system.
Not Available in POS → The product is only available online and not in physical stores.
Example:
A grocery store sells fresh vegetables only in the physical store (POS enabled) but not online.
A digital service subscription is available only on the website (POS disabled).
Additional Settings
-
For iOS Store
This setting specifies whether the product can be sold on the Apple iOS app version of the online store.
Enabled → The product is available for iPhone & iPad users.
Disabled → The product is not listed in the iOS app but may be available on the website or Android app.
Example:
An online retailer may have some products only available on the website and not in the mobile app.
Country Selection
This setting restricts product availability to specific countries.
Global → The product is available worldwide.
🇺🇸 USA Only → The product can be purchased only in the USA.
🇬🇧 UK Only → The product is available only for customers in the UK.
Example:
An electronic gadget might be available worldwide.
Food items may be restricted to certain countries due to import/export regulations.
Delivery Type
This setting defines how the product is delivered to customers.
Home Delivery → The product is shipped to the customer’s address.
Store Pickup → The customer must collect the product from a physical store.
e.g, : Electronics (Home Delivery or Store Pickup)


Name :
The title or name of the delivery type
(e.g., "Home Delivery", "Pickup", "Courier")Description :
A short explanation about what this delivery type is
(e.g., "Items will be delivered to the customer’s home within 2 days")Icon :
An optional icon image you can upload to visually represent this delivery type.
Ord (likely short for "Order" or "Order Number") :
Used to define the order or priority in which delivery types appear in a list
(e.g., 1 for top priority, 2 for next, etc.)Slug :
A URL-friendly identifier used in the backend. Usually lowercase with hyphens instead of spaces
(e.g., home-delivery)Color :
A color code or picker to assign a visual label to this delivery type, helpful for UI/UX purposes.
Stocks
Describes three stock-related functionalities within the iPOS system:
-
Export stocks
-
Stock value
-
Update stock

Here's a breakdown of each functionality:
Export stocks:
This function allows you to export all stock-related data from the iPOS system into an external file format (e.g., CSV, Excel).
This is useful for:
Analyzing stock data.
Generating reports.
Integrating stock data with other systems.
The exported file typically includes information such as:
Product names.
SKUs (Stock Keeping Units).
Available stock quantities.
Prices.
Other relevant details.
Stock value:
This function displays the total monetary value of the current stock held within the iPOS system.
It helps businesses calculate the total value of their inventory assets.
The calculation usually involves:
-
Multiplying the price of each product by its available quantity.
-
Summing up the values of all products.
Update stock:
This function allows you to modify the stock quantities of products within the iPOS system.
It's used to:
1.Record new stock arrivals.
2.Adjust stock levels after sales.
3.Maintain accurate inventory records.
Typically, this involves:
-
Selecting a specific product.
-
Entering the new stock quantity.
-
Reservation
Introduction:
iPOS is a comprehensive Point of Sale (POS) system designed for modern businesses. It offers a range of features including sales management, inventory management, and customer management. Reservation management is a key feature of iPOS, allowing businesses to efficiently manage their customer bookings. This functionality is especially beneficial for businesses like restaurants, spas, salons, and other service-based establishments.
Step 1: Navigate to Reservation Management:
Log in to your iPOS admin dashboard.
Locate the "Reservations" section in the left-hand menu.
Click on it.

Step 2: Create a New Reservation:
On the Reservations page, find and click the "New Reservation" or "Create Reservation" button.

Step 3: Fill in Reservation Details:
Name: (Required)
This field specifies the name of the reservation. The name should be clear and identifiable.
Example:
Hotel Room Booking: Room 01, Deluxe Suite, Family Room
Restaurant Table Booking: Table 01, VIP Table, Window Seat
Event Reservation: VIP Seat A1, Conference Hall 2
Color: (Optional - For Visual Identification)
The color selection allows businesses to visually categorize and differentiate reservations.
🔹 Why Use Colors?
Helps organize and identify reservations quickly in the system.
Provides a visual status indicator (e.g., available, reserved, occupied).
Assists staff in managing high-priority or VIP bookings.
Example of Color Coding Usage:
Green → Available / Open Reservation
Yellow → Pending / Waiting for Confirmation
Red → Reserved / Occupied
Blue → VIP / Special Booking
Gray → Cancelled / Unavailable
Step 4: Add Payment Details (Optional):
If applicable, add payment details for the reservation.
Specify the payment method (e.g., Cash, Credit Card) and the payment amount.
Include any pre-payment information.
Step 5: Save the Reservation:
After filling in all necessary details, click the "Save" button.
You will receive a confirmation message indicating that the reservation was successfully created.
Step 6: Confirm the Reservation:
Confirm the reservation details with the customer.
If needed, send a confirmation message via email or SMS.
Step 7: Manage the Reservation:
On the Reservations page, you can view the reservations you created.
You can modify reservation details, cancel reservations, or change the status.