Pharmarcy Pos System Documentation
Step 1: Counter Opening

-
User logs into the POS system.
-
Select or open the assigned counter (example: EFAB226).
-
Billing operations can begin after the counter is opened.
Pharmarcy pos system Dashboard

Step 1: Select a Product
Click on any product from the left side product list.
    Example:

        Click Iodex Body Pain Expert Spray

        Click Glucometer Set

        Click Blood Pressure Monitor

        Click Digital Thermometer

        Click Citronella Oil
Each click automatically adds the product to the order.
Step 2: View Selected Products (Right Side Panel)
Selected products appear in the right-side order list.
Each item shows:
          Product Name

          Quantity (e.g., 1 x Bottle / 1 x Box / 1 x Piece)

          Unit Price

          Total Price
➕ / ➖ buttons for quantity control
Example:
            Iodex Body Pain Expert Spray (1 x Bottle — 1390.00)

            Digital Thermometer (1 x Piece — 1200.00)

            Citronella Oil (1 x Bottle — 400.00)

            Blood Pressure Monitor (1 x Box — 15000.00)
Step 3: Change Quantity (If Needed)
    Click ➕ to increase quantity

    Click ➖ to decrease quantity
Item total and order total update automatically.
Step 4: Review Order Summary
At the bottom of the right panel, the Order Summary section shows:
Total Products
Example: Total (4 Products)
Total Amount
Example: 17990.00
Step 5: Apply Discount (Optional)
Enter a discount value in the Discount field.
Choose discount type:
            Cash Amount

            Percentage (%)

            Payable amount updates automatically.
Step 6: Select Payment Method
Choose the payment method:

            Cash

            Card
Enter the paid amount if required.
        Example:

                Cash Paid: 17990.00
Step 7: Generate Receipt
Click the Receipt button.
This will:
        Generate the receipt

        Print the receipt (if printer is connected)

        Complete the billing transaction
Step 8: Close Counter (End of Shift)
Click Close Counter when billing operations are finished.
This will:
        Close the active billing session

        Stop further transactions

        Receipt Details
The generated receipt typically includes:
        Pharmacy / Store Name

        Date & Time

        Cashier Name

        List of Products

        Quantity & Price

        Subtotal

        Discount (if applied)

        Total Amount

        Payment Method

        Paid Amount

        Balance

        Receipt Number

        Store Contact Information
Pharmacy POS System — Orders Module
Overview
The Orders page displays all completed and processed transactions.
It allows the cashier or admin to review order history, verify totals, and track sales records.

Step 1: Navigate to Orders Page
  Click the Orders icon from the left sidebar menu.

  This opens the Orders dashboard showing the list of all transactions.
Step 2: Select Date
  At the top of the screen, a calendar-style date selector is available.

  Click on a specific date to view orders from that day.

  The selected date is highlighted.

  Orders refresh automatically based on the selected date.
Example:
Selecting Thursday 19 shows all orders completed on that day.
Step 3: Search Orders
Use the Search orders bar to quickly find a transaction.
You can search by:
    Serial Number

    Customer / Cashier

    Order Number
Matching results will appear instantly.
Step 4: View Order List
Each row represents a completed order.
Every order displays the following information:
Customer
Shows who handled or created the order
Example: Cashier
Order Type
Indicates how the order was processed
Example: DeliveryStatus
Displays the order completion status
Example: FULFILLED
SN (Serial Number)
Unique sequence number of the order
Example: 7, 6, 5, 4
Serial / Reference
Order reference with cashier or system tag
Example: #9 KIRISHA
Subtotal
Total before discount
Discount
  Discount applied to the order

         If no discount → 0.00
Total
Final payable amount after discount
Step 5: Review Order Information
To review an order:
         Locate the order row

         Check subtotal, discount, and final total

         Verify order completion status
This helps in sales tracking and auditing.
Create a Products

The completed Products is automatically listed here
Show Example from the screen:
 Image

 Name

 Price

 Category

 Stock
Create a Customers

Step 1: Click “Create” Button
Click the Create button (bottom-right corner)
This opens the Create Customer form

Step 2: Enter Customer Details
Fill the following fields:
 First Name (Required)

 Last Name

 Address (Optional)

 Mobile Number (Recommended)

 Area  (Select one)

 Subscription Amount
Step 4: Save Customer
 Click Create Button

 Customer now appears in the Customers list

 Customer is ready to be used for orders
Sales Summary Section

Daily Sales Analysis (Sales Summary)
For a more detailed look at daily transactions, navigate to the Sales Summary section.
Time Selection: You can filter data by Today, Yesterday, Last week, and more.
Payment Breakdown:
Cash Sales: Total revenue collected in cash (e.g., 775.00).
Card Sales: Total revenue collected via card payments.
Orders Count: Total number of orders for the selected period (e.g., 2).
Sales/Order Analysis Graphs: View hourly or daily bars representing sales volume and order counts.
Setting
Introduction:
The iPOS system offers a comprehensive set of settings that allow businesses to customize the platform to fit their specific needs. Configuring these settings correctly is crucial for ensuring smooth operations, accurate reporting, and an optimal user experience. This document provides a step-by-step guide to creating and managing settings within the iPOS system, covering the entire process from accessing the settings to finalizing the configuration.

1 : Click On Language Button
Choose language
  English

  Italiano

  German

2 : Click on Theme Button
  Light

  Dark
3 : Click on Printer Settings Button

Printer Settings Includings:
- Gentral

- Printer

-
Receipt & KOT

Step 1 : Fill in the Printer & Shop Details
Step 2 : Click on Create Button
4 : Click on Contact us Button

-
Fill in the Conatct Details
-
Click on Send the Button
Next Click on Cancel Data Button

1 . Enter the Password
2 . Click on Cancel All data Button
Pharmarcy Pos Admin
Dashboard Overview
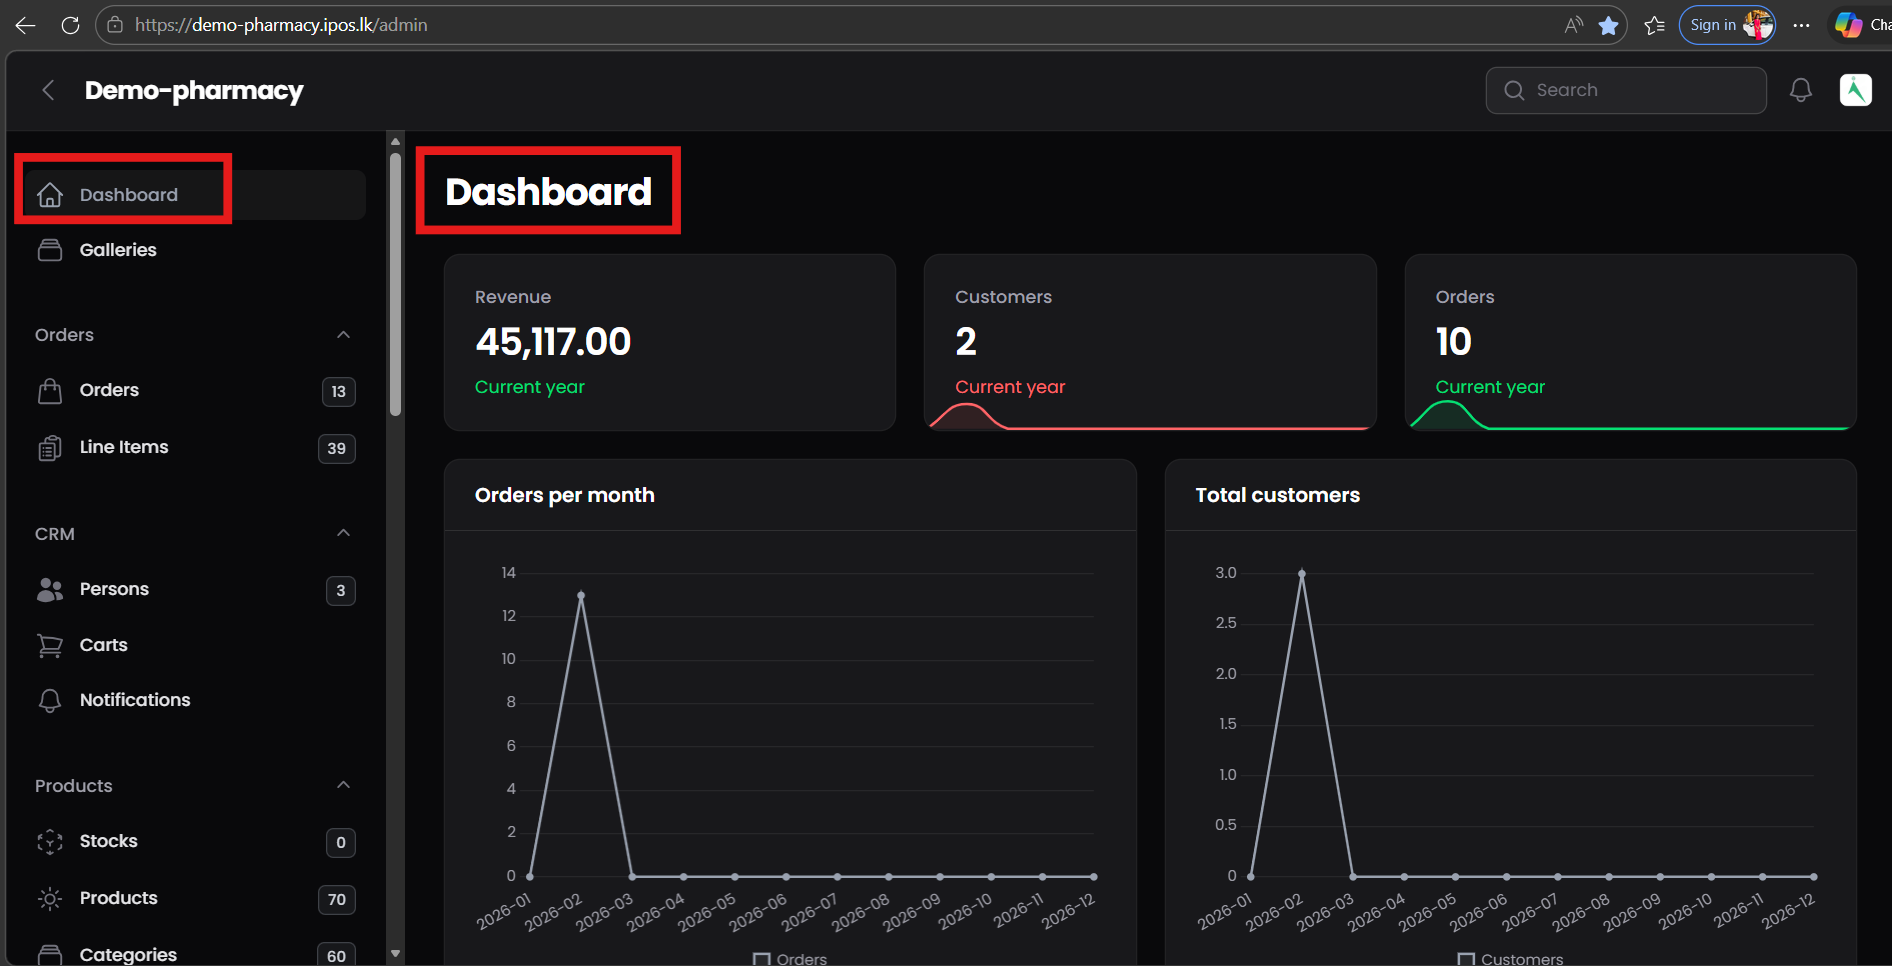
The dashboard provides a quick summary of business performance.
Revenue
    Shows total income for the current year

    Helps monitor overall sales performance
Customers
    Displays total registered customers

    Helps track business growth
Orders
    Shows total number of orders

    Indicates sales activity
Orders per Month (Chart)
    Monthly order statistics

    Helps identify high and low sales periods
Total Customers (Chart)
    Customer growth visualization

    Useful for trend analysis
Orders
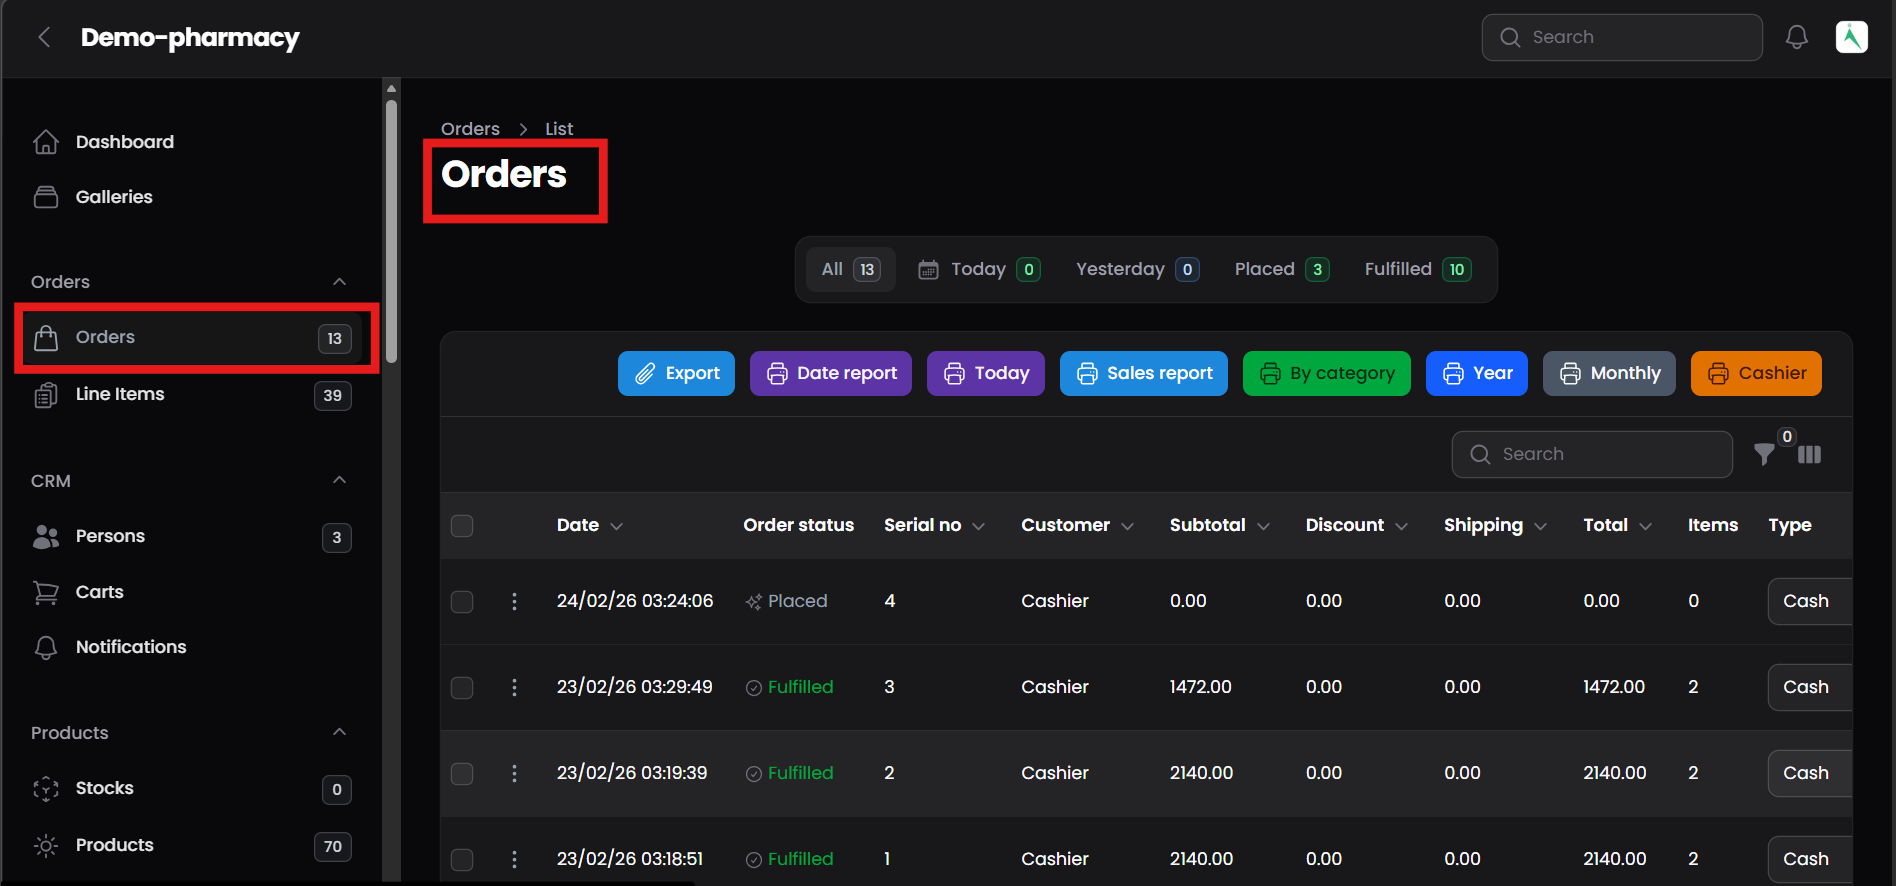
Purpose of Orders Module
The Orders section is used to:
        View all sales transactions

        Monitor order status

        Check billing details

        Generate reports

        Track revenue activity
This is the main area for daily sales verification.
Understanding Order Status Tabs
At the top of the page you will see filters:
     All

         Shows every order in the system.

     Today

         Displays orders created today.

     Yesterday

         Shows orders from the previous day.

     Placed

         Orders that are created but not completed.

     Fulfilled

         Completed and confirmed sales.
Staff should mainly monitor Placed and Fulfilled orders.
Order List Table — Column Explanation
Each row represents one order.
 Date

     Date and time of order creation.

 Order Status

     Indicates current order stage:

 Placed → Order created

     Fulfilled → Sale completed

 Serial No

     Unique order reference number.

 Customer

     Customer name or “Cashier” for direct sales.

 Subtotal

     Total before discounts and charges.

 Discount

     Amount reduced from subtotal.

 Shipping

     Delivery or service charge (if applicable).

 Total

     Final payable amount.

 Items

     Number of products in the order.

 Type

     Payment method (example: Cash).
Persons Section
The Persons module is used to manage all people connected to the pharmacy business.
It centralizes Customers, Suppliers, and Cashiers in one place for easy management and tracking.

Person Types
Customers
    Customers are individuals who purchase medicines or products from the pharmacy.

    Their information is stored to:

    Track purchase history

    Monitor order activity

    Provide better service

    Maintain contact details

    All registered buyers will appear under the Customers list.
Suppliers
Suppliers are vendors who provide medicines, equipment, or other pharmacy products.
This section is used to:
        Maintain supplier contact information

        Support stock management

        Track procurement relationships
Cashiers
Cashiers are staff members responsible for billing and handling orders at the POS system.
This module allows administrators to:
        Monitor cashier sales activity

        Track order handling

        Manage staff records
Screen Features
Filter Tabs
 Tabs are available to filter people by type:

        All

        Customers

        Suppliers

        Cashiers
This helps quickly locate specific records.
Add New Person
The Add New button allows administrators to create a new person record.
Typical information includes:
                Name

                Email

                Mobile number

                Address

                Role

                Search Function
The search bar helps quickly find a person using:
        Name

        Email

        Contact number

        Table Information
The Persons table displays key details for each record:
            Name

            Type

            Role

            Email

            Area

            Address

            Mobile number

            Total orders linked to the person
This information supports customer relationship management and staff monitoring.
Add a New Person
Step - 1 Click Add new (top right).

Step - 2 Fill required fields:

Tabs
Basic: Used to enter main customer details.
Credentials: Used to set login details (if customer needs system access).
Mobile Verification: Used to verify the customer’s mobile number.
Basic Details
 Name*

     Enter the customer’s full name.

 Mobile*

     Enter the customer’s mobile number. This is mandatory and used for contact and verification.

 Address

     Enter the customer’s full address.

 Area

     Select the customer’s area from the list for location-based tracking.

 Type

     Select the person type (Customer, Supplier, Cashier, or Subscriber).

 Primary Role

     Choose the main role of the person in the system (e.g., Customer).
Action Buttons
Create
Saves the customer and returns to the list.
Create & Create Another
Saves the customer and opens a new form to add another customer.
Cancel
Cancels the process and exits without saving.
Credentials

 Email

 Password (leave empty to keep current)

 Roles (Select/tik)
Mobile Verification

 Mobile otp

 Mobile otp expires at
Mobile OTP
 Displays or stores the One-Time Password sent to the person’s mobile number.

 Used to validate ownership of the mobile number.

 Usually system-generated during the verification process.
Mobile OTP Expires At
 Defines the date and time until which the OTP remains valid.

 After this time, the OTP cannot be used for verification.

 Helps improve security by limiting OTP validity.
Is Mobile Verified
Toggle indicating the mobile number’s verification status.
Off: Mobile number is not verified.
On: Mobile number has been successfully verified.
Can be set automatically after OTP validation or manually by an administrator.
Create
Saves the person record along with mobile verification details.
Create & Create Another
Saves the current record and opens a new form to add another person.
Cancel
Discards any changes made in the Mobile Verification tab and exits the form.
Create. Person appears in list; you can now select them when creating orders.
Edit / View person details

Click a person row or the action menu (⋮) for that row.
In the details screen you can:
View order history (orders linked to that person).
Edit contact fields and role.
 Set member/credit balance (if using account/credit).

 Deactivate person (if needed) rather than delete.

 Save changes.
Stocks

 Displays the list of all available product stocks in the system.

 Used to monitor inventory quantity, pricing, and expiry details.
Group By
 Allows grouping stock records by a selected attribute (e.g., product name, variant).

 Helps organize and analyze stock data more efficiently.
Search
 Enables quick searching of stock records by keyword.

 Useful for locating a specific product or variant.
Export Stocks
 Exports the stock list into a downloadable file (e.g., Excel/CSV).

 Used for reporting, audits, or offline analysis.
Stock Value
 Displays the total monetary value of current stock.

 Calculated based on quantity and cost price.
Update Stock
 Used to add new stock or update existing stock quantities.

 Opens a form to modify stock-related details.
Stock Table Columns
 Variant: Product variant or SKU.

 Weight: Weight or measurement unit of the stock item.

 Cost Prz: Purchase or cost price of the item.

 Qty: Available quantity in stock.

 Selling Prz: Selling price of the item.

 Expire At: Expiry date of the stock (if applicable).
Indicates that no stock records are currently available.
Appears when inventory has not been added yet.
Purpose
 Helps track inventory levels, pricing, and expiration.

 Supports better stock control and business decision-making.
Update Stock

Purpose
This screen is used to add new stock or update existing stock details for a product in the iPOS system.
Barcode / Product Selection
You can update stock by entering/scanning the barcode
OR by selecting the product manually from the Product dropdown
Stocks Section
Displays the selected product’s stock-related information
Helps confirm that the correct item is being updated
Purchase Entry Section
This section is used to record purchase and stock details.
Product
Shows the selected product name (auto-filled after selection)
Purchase Date (Purchase at)
         Select the date when the stock was purchased

         Default date is set to the current date
Supplier
         Select the supplier from whom the stock was purchased

         Helps in tracking supplier-wise purchases
Cost Price
         Enter the purchase cost price per unit

         Used for profit and margin calculations
Quantity (Qty)
         Enter the number of units being added to stock

         Stock quantity will be updated based on this value
Selling Price
          Enter the selling price per unit

         This price will be used during billing
Expiry Date (Expire at)
         Optional field to set product expiry date

         Useful for food, medicine, or perishable items
Submit Button
Saves the entered stock details
Updates inventory quantity and pricing
Cancel Button
Products

Purpose
The Products screen is used to view, manage, add, and organize all products available in the iPOS system.
New Products Button
 Used to add a new product to the system

 Opens the product creation form
Product Status Filters
 All – Displays all products in the system

 Available – Shows products that are active and available for sale

 Unavailable – Shows products that are disabled or not available
Count beside each option shows the total number of products
Export Products Button
 Used to export the product list

 Helpful for reports, backups, or sharing product data
Search Bar
Allows users to quickly find products by name, barcode, or keyword
Basic Details

Product Name — e.g., Ghee Lamp (required)
Secondary Name/Tamil/Sinhala Name
Barcode - (required)
Slug
Category — e.g., Pooja Items (must exist or create category first)
Product Identification color
Brand
Price Section

 Price — retail price shown on POS

 Selling Price - (required)

 Wholesale Price

 Small & Medium Enterprise

 Retail Price
Weight & Misurement
 Unit — Ps, Packet, Kg, Litre, etc.

 Weight - (required)

 Max order qty
Description & Image

 Images (600 * 600)

 Description

 Order
Additional Details

Create product.
Confirm product appears in POS product tiles or searchable list.
Create a New Category

Purpose
A category groups related products so cashiers can find items quickly on the POS screen and reports can be generated by category.
Examples: Medical Devices, Wellness, Health, First Aid
Step 1 : Click the Add new or + New Category button (usually top-right).
Fill category fields

Basic Details
 Name (Required): e.g., Medical Devices

 Language (English/Tamil/Italy/German)

 Slug

 Color
Image / Icon (optional): upload a small icon for POS tile view.

 Order

 Available / Unavailable

 Image

 Image sm
Create a subcategory (example)

 If you want First Aid, Health Devices, Support & Brances

 Create  as a top-level category (if not already present).
Click Create button. You should see a confirmation message and the new category listed.
-